


Introduction
UML (Unified Modeling Language) Activity Diagrams are a powerful tool for modeling business processes. They visually represent the flow of actions and decisions in a process, making it easier to understand the dynamics of various workflows. This tutorial will guide you through the steps of creating a Business Process Model using an Activity Diagram, focusing on the provided example.
Key Components of UML Activity Diagrams
Before diving into the tutorial, it’s essential to understand the basic components of an Activity Diagram:
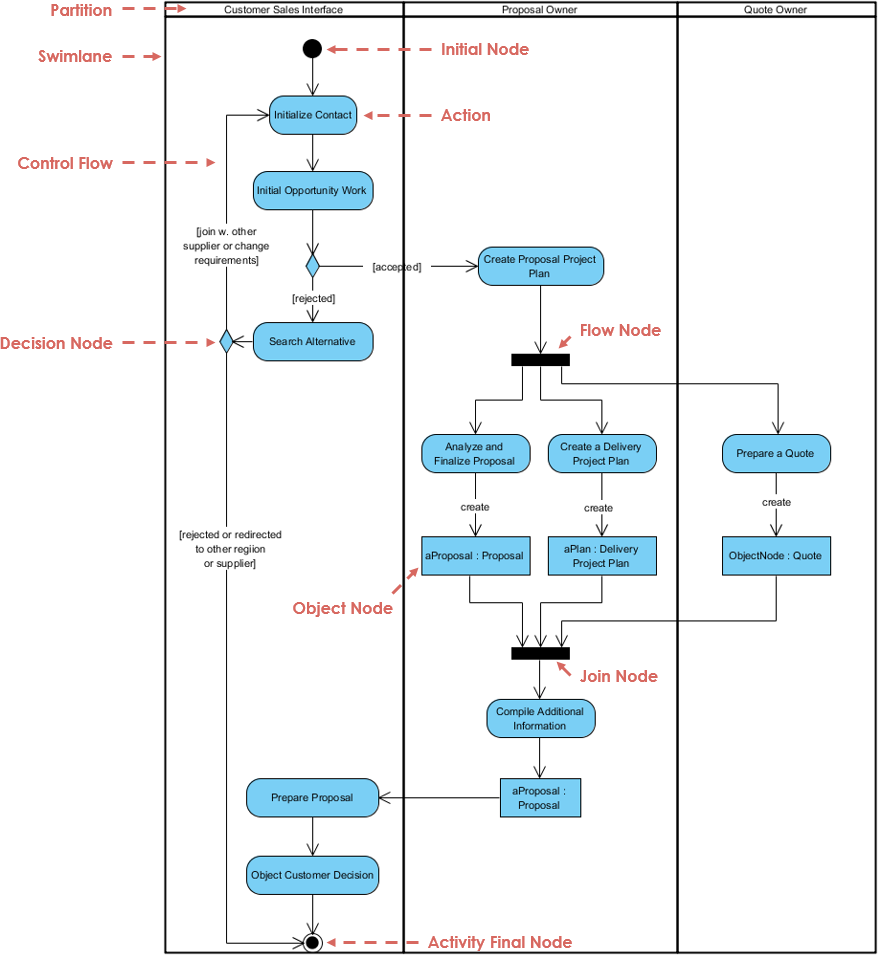
- Swimlanes: These are vertical or horizontal partitions that represent different actors or roles involved in the process. Each swimlane contains the actions performed by that actor.
- Flow Nodes: These indicate the flow of control in the process. They can include actions, decisions, or joins.
- Action Nodes: These represent specific tasks or actions in the process.
- Decision Nodes: Points where choices are made based on certain conditions.
- Object Nodes: Represent the data or objects being processed throughout the activity.
Creating an Activity Diagram for Business Process Modeling
Step 1: Define the Scope
Identify the business process you want to model. In this example, we will model the proposal creation process, focusing on the roles of the Customer, Proposal Owner, and Quote Owner.
Step 2: Identify the Swimlanes
Create swimlanes for each role involved in the process:
- Customer Side Interface
- Proposal Owner
- Quote Owner
Step 3: Map Out the Activities
Using the provided activity diagram:
- Initialize Contact: The process begins with the customer initiating contact regarding an opportunity.
- Action – Initial Opportunity Work: The Proposal Owner starts working on the initial opportunity.
- Control Flow: The flow indicates that the next step is to search for alternatives.
- Decision Node: Here, the process can branch based on whether an alternative is found.
Step 4: Detail the Actions
For each swimlane, specify the actions:
- Proposal Owner:
- Create a draft Proposal Project Plan.
- Analyze and finalize the Proposal.
- Quote Owner:
- Compile additional information needed for the proposal.
Step 5: Include Object Nodes
Identify any key objects involved in the process, such as:
- Proposal: Represents the proposal document being created.
- Additional Information: Represents any extra data required for proposal completion.
Step 6: Join and Finalize the Process
Use a Join Node to indicate that all activities must be completed before finalizing the proposal.
Case Study
The following swimlane activity diagram illustrates the process of creating a proposal, capturing interactions between three key roles: the Customer, the Proposal Owner, and the Quote Owner. Each swimlane represents one of these roles, allowing for a clear visualization of responsibilities and actions taken throughout the proposal development process.
Components of the Diagram
- Swimlanes:
- Customer Side Interface: Represents the customer’s involvement in initiating and providing input for the proposal.
- Proposal Owner: Responsible for drafting and finalizing the proposal.
- Quote Owner: Compiles additional information needed to support the proposal.
- Flow Nodes:
- Actions: Each action is represented within the swimlanes, showing what each role is responsible for at various stages of the process.
- Decision Nodes: Indicate points where decisions are made, affecting the flow of the process.
- Object Nodes: These represent key information or documents, such as the proposal itself and any supplementary information required.
Interpretation of the Diagram
The diagram starts with the Customer initiating contact, which is the trigger for the process. The Proposal Owner then begins preliminary work on the opportunity, which includes searching for alternatives. This step introduces a decision node where the flow can diverge based on whether alternatives are found.
- If alternatives are available, the Proposal Owner proceeds to create a draft proposal and analyze it for finalization.
- If no alternatives are found, the process involves preparing a quote, which is handled by the Quote Owner. This role is tasked with compiling the necessary additional information to finalize the quote.
Purpose of the Diagram
The primary purpose of this swimlane activity diagram is to:
- Clarify Responsibilities: By delineating roles and actions within swimlanes, the diagram helps stakeholders understand which role is responsible for each part of the process.
- Visualize Workflow: It provides a clear visual representation of the sequence of actions, decisions, and interactions among the roles involved, making it easier to follow the process.
- Identify Decision Points: Highlighting decision nodes allows teams to pinpoint critical moments in the workflow that may require careful consideration or additional resources.
- Facilitate Communication: This diagram serves as a communication tool among team members, stakeholders, and clients, ensuring everyone has a shared understanding of the process.
- Process Improvement: By visualizing the workflow, organizations can identify potential bottlenecks, redundancies, or areas for improvement in the proposal creation process.
Conclusion
UML Activity Diagrams are an effective way to model business processes, providing clarity and structure to complex workflows. By following the steps outlined in this tutorial, you can create an Activity Diagram that accurately represents the interactions and decisions in your business process. This visualization not only aids in understanding but also in communicating the process to stakeholders effectively.
Use tools like Visual Paradigm to draw your diagrams easily and efficiently!
- Activity Diagram Tutorial – Visual Paradigm
- Activity Diagram Example: Swimlane – Visual Paradigm Community Circle
- Online Swimlane Diagram Tool – Visual Paradigm
- Activity Diagram – Visual Paradigm Handbook
- How to Draw Activity Diagram? – Visual Paradigm User Guide
- ATM Activity Diagram with Swimlanes – Visual Paradigm
- What is Activity Diagram? – Visual Paradigm
- Understanding Activity Diagrams in UML: A Comprehensive Guide – Visual Paradigm Guides
- Activity Diagram Swimlanes – Discuss the Visual Paradigm