


Unified Modeling Language (UML) is a powerful tool used by software engineers and designers to visualize, document, and communicate the various aspects of a software system. UML offers a wide range of diagram types, each designed to represent specific aspects of a system’s architecture and behavior. Among these, the Profile Diagram stands out as a specialized diagram that allows users to extend UML to meet their specific modeling needs. In this article, we will delve into the world of Profile Diagrams in UML, exploring their purpose, elements, and how they can enhance the modeling process.
What is a Profile Diagram?
A Profile Diagram in UML is a diagram type that extends the standard UML metamodel to define custom stereotypes, tagged values, and constraints. It enables users to tailor UML to their specific domain or application, making it a versatile and adaptable modeling tool. Profile Diagrams are particularly useful when you need to create models that capture domain-specific concepts, as they allow you to define new elements and relationships that are not available in the standard UML.
Elements of a Profile Diagram
To understand Profile Diagrams better, let’s take a closer look at their key elements:
- Metaclass: In a Profile Diagram, you start by selecting one or more metaclasses from the UML metamodel. Metaclasses are like templates for elements in UML, such as classes, associations, and attributes. You can then customize these metaclasses to create stereotypes.
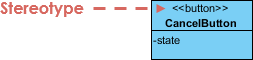
- Stereotype: A stereotype is a custom extension of a metaclass. It allows you to define new types of UML elements by adding specific attributes and constraints. Stereotypes are represented as text enclosed in guillemets (<< >>) and are typically named to reflect their intended purpose in the domain.
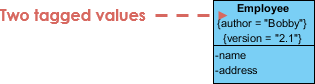
- Tagged Values: Tagged values are used to attach additional information to UML elements. When you define a stereotype, you can specify tagged values that are associated with it. For example, if you create a “Person” stereotype, you might include tagged values like “Name” and “Age” to provide more information about instances of the “Person” stereotype.
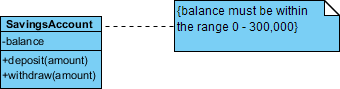
- Constraints: Constraints allow you to specify rules or conditions that must be satisfied by elements conforming to a stereotype. These constraints are defined using the Object Constraint Language (OCL) or other constraint languages and help ensure the correctness of your models.
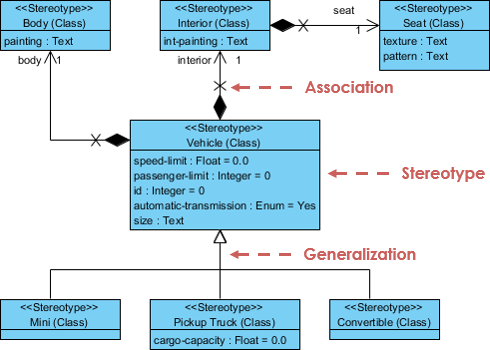
Using Profile UMLL Notation in a Class Diagram
Why Use Profile Diagrams?
Profile Diagrams offer several benefits in UML modeling:
- Customization: They allow you to tailor UML to your specific domain or project requirements. This makes UML a more versatile modeling language that can accurately represent complex systems.
- Clarity: By defining domain-specific stereotypes and constraints, Profile Diagrams can enhance the clarity and understanding of your models. This is especially useful when you’re communicating with stakeholders from non-technical backgrounds.
- Consistency: Profile Diagrams promote consistency in your modeling efforts by standardizing the terminology and structure used in your models. This can improve collaboration among team members and reduce misunderstandings.
- Reuse: Once you’ve created a profile, you can reuse it across multiple models and projects, saving time and effort. This is particularly valuable in larger organizations or when working on similar systems.
Creating a Profile Diagram
To create a Profile Diagram, follow these steps:
- Select Metaclasses: Identify the UML metaclasses you want to extend with stereotypes. These metaclasses should represent the base elements that you want to customize for your domain.
- Create Stereotypes: Define stereotypes for the selected metaclasses. Specify their names, tagged values, and constraints as needed to reflect your domain concepts.
- Apply Stereotypes: In other UML diagrams (e.g., Class Diagrams or Use Case Diagrams), you can apply your custom stereotypes to UML elements. This is done by adding the stereotype name in guillemets (<< >>) before the element name.
- Add Tagged Values and Constraints: Populate the tagged values and constraints associated with each stereotype to provide additional details and enforce domain-specific rules.
Conclusion
Profile Diagrams in UML are a powerful tool for customizing the language to suit your specific modeling needs. They provide a means to extend the UML metamodel, define domain-specific concepts, and improve the clarity and consistency of your models. By mastering the art of creating and using Profile Diagrams, you can take your UML modeling skills to new heights and create more effective and domain-specific software designs.